I work so hard on these, and spend so much time on them, that I feel like they need to be on display somewhere for the world to see LOL
Seriously - Maybe it will help someone to see an example of my weekly lesson plans :-)
The template is adapted from one our principal gave us to use a few years ago.
Click here to see my LPs for the week of August 19th
Lesson Plans
Re-invigorated
The last couple of years I have been afraid I'm hitting that burn-out stage that everyone talks about. I still love my job, I still love my kiddos, but the paperwork and bureaucracy aspects of the job have started getting to me. I have neglected my blog (this one and, to an extent, my classroom one) and some of the more creative and enjoyable things related to my job and been doing just what has to be done (which, granted, in my over-achieving case is arguably quite a bit more than the bare minimum for most people but still makes me feel a little like a slacker).
This weekend I attended the Autism Society of America national conference in Pittsburgh and am feeling excited about work again - genuine excitement! More than that, I've been re-inspired to be an active member of the autism community and share - which means a renewed commitment to blogging here. Hold me accountable!! I'm at the airport, right now, about to board the flight home, but wanted to at least take the time to write a quick note putting my commitment into writing. I will be back to blog about the conference, things I learned about at the conference, new ideas I have, and share more about what I already do. I was reminded this weekend that I do have a lot of valuable knowledge, information, resources, and ideas that I should share with others. By no means am I an expert (is there such thing as an autism expert? not in my opinion!) and I have plenty left to learn!
Topics I plan to write about in the near future include
- a recap of the conference
- collaborating with other professionals (OT/PT/SLP)
- parent/teacher communication and partnership
- technology and its use in the classroom (assistive tech and regular tech)
- classroom logistics - scheduling, lesson planning, data collection, etc.
- I'm finishing up my dissertation so I can share LOTS about the research in stereotypy ... but that will have to be later because I have had just about all of that I can take for now :-)
Not sure if I have any "regular" visitors left since it has been so long since I blogged, but if anyone is still here - what topics would YOU like to see addressed?
EVERY child deserves a fun summer!
Once a year, I "spam" my blog with this request. If you could share the link (www.gofundme.com/campmays) I would greatly appreciate it!!
Go to www.campmays.com to learn more, or visit our facebook page
PLEASE feel free to share this link - Camp Mays is funded 100% through donations! Every little bit helps!!
My students' parents face several challenges once school is out for the summer. While summer break is, for most kids and families, full of opportunities and fun, that's not the case a lot of the time with my students. It is often difficult if not impossible for parents to find a babysitter or child care provider who is qualified and willing to care for some of my students so their parents have almost two months with no break at all from caring for their child - a child who requires constant active supervision. Additionally, many of my students' parents spend so much time, money and energy just providing everyday care for their kids that they often have little time, money or energy left over to do "fun" things.
In an effort to provide some respite for my students’ parents and provide some opportunities for "typical" summer fun experiences for my students over the summer months, a few years ago I began taking my students on day trips to places like White Water, Children's Museums, parks, etc. What has evolved has been dubbed “Camp Mays”. I rent a van each week and take my students (along with several of my friends, family and coworkers who volunteer to help) to places like the movies, Jungle Jumpers, Stone Mountain, the Georgia Aquarium, and swimming. Some of my students' families may not have otherwise been able to provide these opportunities for their child. In the beginning I funded “Camp Mays” almost solely from my own pocket – purchasing the admission tickets, renting the van, buying the gas, and buying lunch for each child and volunteer. Families do not have to pay anything at all for their child to be able to participate in Camp Mays. In each of the first two years I spent over $3000 of my own money on Camp Mays. In 2011, I recieved over $1000 in generous donations and spent over $2000 on top of that. Last year I raised over $3000 in donations!! Because I get new students each year, and don't want to exclude former students who have moved on to middle school or moved to other schools in the county, Camp Mays grows each year. This year I am expecting to have 25 students with disabilities, which means I will need more volunteers. I will need a bus instead of a van!
I feel that these opportunities provide such a great service to my students and their families – mainly giving the parents a small break from the extreme demands that a child with a disability presents almost constantly and providing opportunities for my students to participate in fun activities just like other children.
Please visit www.campmays.com to learn more and see photos from previous adventures. 100% of all money collected will go directly towards... van rental, gas, admission tickets, lunch, and/or snacks.
Easter fun
Wow - it's been a while since I've blogged. There have been a lot of changes in my professional life, but really things aren't that different. Our county created MOID classes at three other schools and there is now only one at my school. One of the MOID teachers moved to the SID/PID class, one moved to gen ed kindergarten. The SID/PID teacher moved to the MOID class at another school, and both of my paraprofessionals were sent to another school. All of the students were sent to the program closest to their home school, so I lost 5 students and gained several from the other MOID classes. My classroom is no longer a MOID class disguised as an AU class (or vice versa). I have two students who do not have any ASD diagnosis (I had three but one moved) but the other 7 are on the spectrum, which is why I say it's really not that different.
Anyway, I feel like I've neglected this blog - even though I'm not strictly an "autism teacher" this year, I still realize that most of what I do in my class would very much be applicable in an "autism class", especially since over 2/3 of my class has autism :-)
This past Friday, of course, we did a lot of Easter activities. Obviously the Easter fun in my class is MUCH more structured than your average elementary school class party. Here are some of the things we did and how I kept it educational!
First thing we did was make these foam egg crafts (I got the materials from Wal-Mart):

The top left craft gave us a lot of opportunity to work on prepositions (top/middle/bottom), colors, and choice-making (i.e. "which color do you want for the bottom of your egg?") as well as some visual perception (putting the pieces together) and the usual fine motor (gluing) and following directions.
The egg on the top right provided a lot of fine motor (peeling the back off of the little foam stickers and placing them on the egg), requesting (I kept all of the sticker pieces and they had to ask for the ones that they wanted - pink dots, blue rabbit), and letter ID and/or spelling their name. The bottom egg was more requesting and fine motor as well as practicing big/little.
Next we made baskets:


The kids either cut or tore green construction paper into small strips to make Easter grass (fine motor) and put them in the basket. Then I gave them the bottom piece of each color egg and they had to find the matching top piece and put it together. They counted how many eggs they had and told me the color of each egg. Then we twisted a pipe cleaner on to make the handle (lots of fine motor in this one).
Next up: adorable bunny eggs!

I taped the egg pieces together to keep the kiddos from continually pulling them apart. I used glue dots with one side already affixed to all of the pieces (I did this beforehand) so all the kids had to do was pull the other piece off of the glue dot and put the piece on the egg. We worked on body parts (How many eyes/nose/ears) and more fine motor. There's also a white bunny tail on the back (though it looks like the purple egg must have a pink tail since the nose is white LOL). I drew the whiskers and mouth on for the kids. We then did a little pretend play by making our bunnies hop into our baskets.
What is Easter without dyeing eggs? Of course we did that too:

Each student got to choose two colors (which, of course they had to identify). After the eggs dried, we decorated them further. For one set of eggs, the kids got to put stickers on them.


After having cupcakes, cookies, and other yummy treats ...

The kiddos got their Easter baskets from me. Naturally, opening the eggs in the basket was structured as well. I passed out the baskets, everyone looked at the big things (stuffed dog, coloring book, playdough, cup) that was not in an egg and talked about them, then we moved to the eggs.
I told the kids to find their blue eggs. When everyone had found their blue eggs (there were two of each color in their basket), I had them shake the eggs. "Which one is louder?" (We've been talking about sound in science) -"let's open the loud blue egg first! Everyone open your loud blue egg" (Inside, each student had a penny, nickel, dime, and quarter.) We talked about the coins, their values, etc. then put the money back in the blue egg. "Now open the quiet blue egg!" (a little spider ball) We described the spider balls ("Is it hard or soft? What color is yours? Is it big or little?") then put them back in the blue eggs. Now put the blue eggs back in your basket.
We repeated this with all of the eggs. Here were the contents and what we did with them (some were just for fun, most had some sort of educational component):
- coins - identify, tell value
- spider balls - describe, color
- sound wave (a slinky - we have used a slinky as a model of a sound wave in science for the past couple of weeks - so the students had to show me how the sound waves move up/down and back/forth to make loud/soft and high/low sounds)
- package of fruit snacks (What do you think is inside this bag? How do you know? What do we do with them?) - we didn't eat these now - saved them to take home
- small package of M&Ms (What do you think is inside this bag? How do you know? What do we do with them?) - we didn't eat these now - saved them to take home
- little bottle of bubbles - I opened an extra bottle and blew some bubbles for us to pop
- little toy dinosaur (boys), little ring (girls) - what is this? describe it.
- toy frog (What does a frog say? How does a frog move? What is a baby frog called? - review from a past science unit)
- bouncy ball - just for fun - we bounced them a few times before putting them away to play with at home
- Easter erasers - a bunny and an egg - describe them
- Hershey's kisses (5) - count them, what color are the wrappers, what shape are they?
- I can't for the life of me remember what was in the last egg!!
After opening and re-closing all of the eggs, I put each student's eggs in a little treat bag that I wrapped up and put in their basket and then put the baskets away (to make sure all 12 eggs made it home with each child) until time to get on the bus.


Tag! I'm it!
So I was tagged in another blog with the following directions, and being a rule-follower, I must comply :-)
- Tell 7 things about myself
- Tag 7 blogs I love and
- Hope those bloggers continue passing on the "cyber-accolades"
First things first, seven things about Nicole:
1. I L.O.V.E. Elmo :-) Here is part of our bonus room:

2. My undergraduate degree is in music performance (I play clarinet and piano)
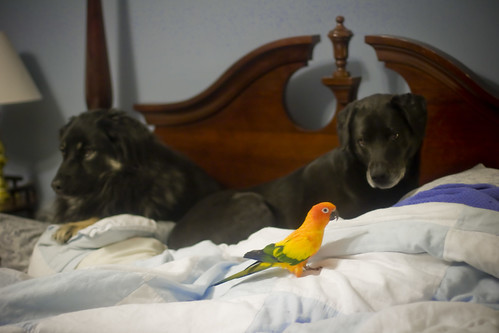
3. My husband and I have two dogs (mutts - Buffy and Faith) and a parrot (sun conure - Soleil)
4. I love to sing - I am known to frequently burst into random songs at any given time
5. I am an "amateur professional" photographer
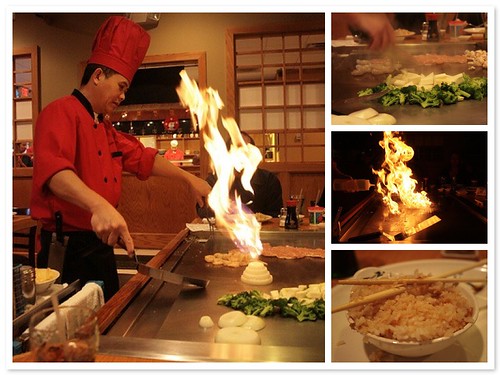
6. I love, love, LOVE Kyoto Japanese hibachi restaurant in Loganville (they put BACON in their friend rice!)
7. I can (and often do) recite every line from every episode (maybe not *every* line but pretty darn close) from Friends, Seinfeld, and the Big Bang Theory ... as well as from the movies Bring It On, Miss Congeniality, The Jerk, Forgetting Sarah Marshall, My Fair Lady - there are probably others but I can't think of them right now LOL -- if I'm not singing a song in response to something random, I am probably quoting a TV show or movie in response LOL
And now, seven amazing special education blogs:
1. The blog in which I was tagged, MD Teacher's Space, is a brand new blog but I look forward to seeing what it becomes!
2. The mother and goddess of all special education blogs, of course, Teaching Learners with Multiple Special Needs
Pouring
This is a short and sweet post just to share a little glimpse of one moment in a day in Mrs. Mays's class. A moment that provides:
- an opportunity to choose (have some control over their life - they choose what color cup they want and what they want to drink)
- an opportunity to be independent
- an opportunity to practice a skill
I've posted before about our lunchtime routine (here and here), and if you have read my blog then you probably know that I like to try to incorporate as many opportunities to work on daily living skills as I can throughout the day. One of the things we have been working on lately is pouring.
 The pitchers that I use are from Lakeshore. I have one with white milk, one with chocolate milk, one with water and one with juice. After my students wash their hands, they come to the kitchen and pour themselves a drink. Some of my kiddos are quite adept at this skill already, others need assistance and lots of practice (hence the towel). Here's one of my expert pour-ers:
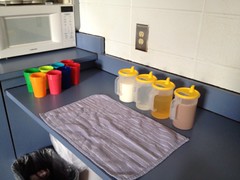 |
| Our "pouring station" |
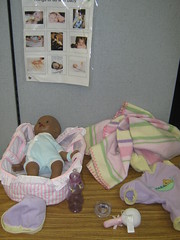
Pretend Play
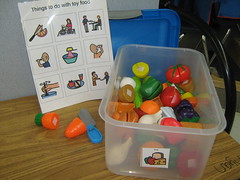
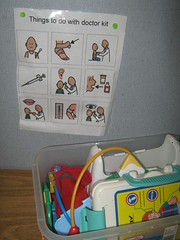
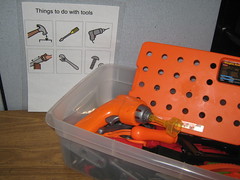
Children with autism often have difficulty pretending. They don't always use toys the way typical children do - give them a tea set and they may bang the cup on the table, spin the plate, etc. rather than pretend to pour or drink tea. They don't intuitively associate the toy pieces with real-life situations or they don't know what to do with the toys. One thing that we work on in my classroom is learning *how* to play appropriately. Here is one way I address that - by providing visual prompts of what to do with the toys!
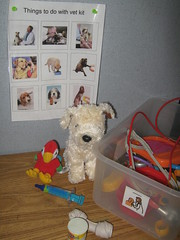
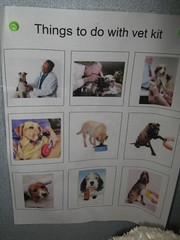
Initially a paraprofessional, peer buddy, or myself will work with the student - pointing out different things that the child can do with the toy as well as modeling, prompting and reinforcing appropriate play. In addition to practicing "pretending", there are tons of opportunities for working on communication - expressive and receptive - while playing. We work on identifying items or following directions that involve discrimination using these toys and visuals (tell the student to "brush the dog" - they have to locate the brush, locate the dog, and perform the action). We point to a picture and ask "What can you do?" and they have to describe the picture (i.e. wash dishes). We use the knife to pretend to cut food and ask "What am I doing?" and the student tells us "cutting". Or we put the hat on the baby and ask the student to "show me what I'm doing" and they point to the correct picture on the visual. When the student becomes more proficient at playing, they play independently or with other students and the visuals serve as reminders for them.
How do I determine what to include on the visual prompt? The best way I've found is to watch typical kids playing with a similar toy and note what kinds of things they do!
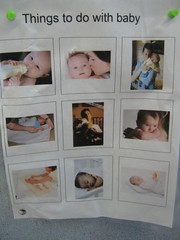
Some of these particular visuals were made with photos found on the internet, others use boardmaker symbols - you could take photos of yourself or someone else playing with the actual toy pieces you have, use drawings, or whatever works for your students!
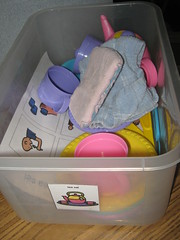
I store the visual in the tub with the toys so that it's always available at playtime!
Camp Mays
I know that times are tough for everyone right now financially but if you have a few dollars to spare, Camp Mays could use the help!!
I would love it if readers could share this on their own blogs, facebook, twitter, etc.
As most of my readers realize, parents of students with severe autism face several challenges once school is out for the summer. Our county's extended school year only lasts three weeks which leaves almost two months where my students are at home. While summer break is, for most kids and families, full of opportunities and fun, that's not the case a lot of the time with my students. It is often difficult if not impossible for parents to find a babysitter or child care provider who is qualified and willing to care for some of my students so they have almost two months with no break at all from caring for their child - a child who requires constant active supervision. Additionally, my students' parents spend so much time, money and energy just providing everyday care for their kids that they often have little time, money or energy left over to do "fun" things.
In an effort to provide some respite for my students’ parents and provide some opportunities for "typical" summer fun experiences for my students over the summer months, a few years ago I began taking my students on day trips to places like White Water, Children's Museums, parks, etc. What has evolved has been dubbed “Camp Mays”. Last summer, I rented a van each week and took my students (along with several of my friends, family and coworkers who volunteered to help) to a movie, Jungle Jumpers, Stone Mountain, the Georgia Aquarium, and swimming. Some of my students' families may not have otherwise been able to provide these opportunities for their child. In the past I have funded “Camp Mays” almost solely from my own pocket – purchasing the admission tickets, renting the van, buying the gas, and buying lunch for each child and volunteer. Families do not have to pay anything at all for their child to be able to participate in Camp Mays. In each of the past two years I have spent over $3000 of my own money on Camp Mays. This year my husband is out of work so I am scaling down the activities and doing more free things (like swimming at a friend’s pool, going to the playground and park). I feel that these opportunities provide such a great service to my students and their families – mainly giving the parents a small break from the extreme demands that a child with severe autism present almost constantly and providing opportunities for my students to participate in fun activities just like other children. So even though I really can't afford it, I still want to go forward with Camp Mays this summer and am trying to find ways to do so.
100% of all money donated will go to van rental, gas, admission tickets, lunch and snacks for Camp Mays adventures.
If you would like to see some pictures of my students and our adventures, I invite you to visit our class blog at http://mrsmays.edublogs.org
Specific entries about Camp Mays can be found at the following addresses:
CBI resources
In my school district, elementary schools are typically allotted four CBI (Community based instruction) trips each school year. Many teachers take one each grading period but I usually choose to take all four toward the end of the year. I know that if I only do something once every few months, I forget a lot between times - but if I do it several times consecutively it gets ingrained in my brain a little better, so I think that taking all four trips close together increases the likelihood of generalization for my students.
This means that I spend a lot of time during the year teaching community skills without actually going into the community. I generally focus on these areas:
- community signs - recognizing and identifying them and what they mean
- community places - recognizing and identifying them and understanding what we do and see in different places
- community helpers - recognizing and identifying them and understanding what they do
- practicing skills like addressing/stamping mail, ordering from a menu, shopping from a list, paying for things
Most of the resources mentioned here are store-bought but community instruction materials are pretty easy to DIY - take a walk through your community and take your own pictures of buildings, people, etc. A child with autism is much more likely to recognize an actual picture of the post office in their own town than they are a generic "post office" photo or drawing! Search online using flickr or google images (make sure you look for pictures licensed under a creative commons license so you aren't stealing copyrighted work!) to find pictures. Use those pictures to make flashcards, worksheets, etc.
You can also take your own pictures for social stories or your own video for video modeling - just make sure you get permission from the store/doctor/post office/whatever before you do so. Usually when you explain that you are making a video or picture-story for a child/children with a disability to learn about shopping/visiting the doctor/going to the post office/whatever, people are more than happy to cooperate and allow you to photograph/video. Some places, though, have to get permission from corporate offices before allowing any photography or video to be taken - so call ahead!
 Signs
Signs I have, use and love PCI's Survival Signs program (software, flashcards, large signs, bingo games, reproducible worksheets and board game - they are all awesome). The worksheets have students match the picture parts of the sign to the words on the sign, which works on word recognition and plays to the visual strengths of kids with autism. I love, though, that the curriculum focuses not just on recognizing the word/picture but also on things like where you see the signs, what to do when you see them, and comprehension of what the sign *means* and not just what is *says*
 I also like the Conover Company's iPod/iPad app, Community Signs and Words for many of the same reasons - the videos explain what the signs say, mean and what to do when you see them. Conover Company has several apps as well as comuputer software programs that I covet ... for example: Clothing Store Signs and Words, Emergency Signs and Words, Grocery Signs and Words, Information Signs and Words, Pharmacy Signs and Words, Public Transportation Signs and Words, Restaurant Signs and Words, Safety Signs and Words, School Signs and Words, Shopping Signs and Words, Survival Signs and Words and Words that Direct ... and one day when I win the lottery I will surely purchase them all!
 Attainment has a set of Survival Sign Software that includes Basic Signs, Safety Signs and Community Signs. It uses video to teach, has quizzes where the student had to choose the correct sign and (my students' favorite part) they get to put signs in photos of real-life scenes. The software also comes with printable activities.
 Remedia Publications has flashcards, a workbook and a video - I have, use and love the flashcards and workbook, just discovered the video while writing this post - it is now on my wishlist!!
Here is a survival sign activity from Speaking of Speech
Trend has a great bulletin board set of Safety Signs and Symbols, a learning chart, and
Here is an activity I found on Boardmaker Share: Survival Signs in my Community (*requires Boardmaker Studio)
Community Places
Also from Attainment is Community Success which has illustrated social skills, "OK" and "Not OK" examples, and step-by-step pictures that I use to make my own social stories, checklists, shopping lists, visual prompts, and more. For example, there is a little picture of each department in a grocery or department store, pictures for all of the steps involved in community outings (find items on your list, place items on counter, give cashier money, wait for change, say thank you, etc.). There are a few assessment pages in the back of the book as well.
Another one from Attainment is the Stepping Out curriculum. My favorite thing about this is that is came with prompting/cuing materials like a money-counting guide, ID cards, picture prompt cards, etc. It also has worksheets that would be super fantastic for older and/or higher functioning students than mine - but they do provide a great framework and starting point for making similar activities for my students.
One of our class favorites, Mr. John from Special Kids, has a great video called "Let's Go To" - I highly recommend ALL of the Special Kids videos. They are great for video modeling, vocabulary, and spelling.
PCI has- Community Places Bingo is another great way to practice idenitfying places in the community as well as the services provided by each place. (They also have Community Helpers Bingo)
Community Helpers
Stages (Language Builder) flashcards are one of my staples - and their Occupations flashcards are a MUST. There are two flashcards (a male and female) for each of over 50 careers - and they are actual photographs. Stages also has a theme kit which includes the occupation flashcards, posters, BINGO and memory matching game cards.
Trend's Community Helper bulletin board set also includes photograph-type pictures of real people - and they have flashcards and border to match.
Attainment's Members of the Community has some great pictures of different people who work in the community as well, with activities and worksheets to go along.
I love the DK book Jobs People Do because it has pictures of children dressed up for each career and my kids like looking at the pictures.
People and Places
 Most of my favorite materials are the ones that tie together the people and places. I usually bring these out after the student is able to identify/label the people and the places separately - then we start tying it all together by talking about where people work, what tools they use, things we see at the different places, etc.
 There is an awesome pocket chart set from Learning Resources that has transportation, tools, people, buildings and street signs that students can sort.
Lakeshore has a Community & Careers Theme Box with lots of cool stuff in it - bingo type boards of things we see at different places, little buildings and cards to sort what we see where (my favorite part), maps and more.
One of my favorite resources from Lakeshore is now discontinued - Let's Talk About Social Studies discussion cards include a set on community helpers/tools/places. If you ever see them at a yard sale or anything, I'd recommend grabbing them!
These flashcards have pictures of people, things, and places in the community on one side and "WH" questions on the other side - they are great once a student can label the people/places/things in the community!
And last but CERTAINLY not least, Karen Cox has a plethora of activities and resources on her website!
What are some of your favorite resources for teaching students about the community?
MIA
I want to apologize for neglecting my blog!
Here are the reasons/explanation :-) (not excuses): 10 annual reviews in January and February, 8 alternate assessment portfolios due in March, and I take my comprehensive exams for my PhD on Monday and Wednesday.
I will be back very soon with new posts!!
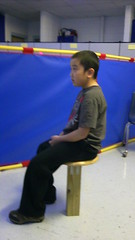
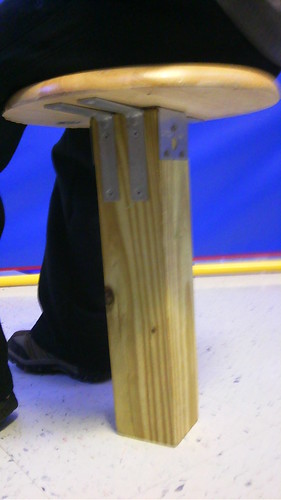
T-Stool
I have a student who is constantly "crouching" in his chair with both feet in the seat. He also frequently slams his body against the back of the chair with great force and likes to sit with his chair tipped back with the front legs off of the floor. This may not be a problem sometimes but this particular student is unable to focus on anything while he wiggles and rocks in his chair, he gets so caught up in his movement that he zones out of everything else. I wanted to try a T-stool with him because it would force him to keep his feet on the floor to balance, allow him to wiggle a little bit, and since it doesn't have a back it would stop his body-slamming.
My daddy, master classroom carpenter, came to the rescue once again :-) He built this T-stool for one of my students using the top/seat from a broken bar stool. He made the base (the "leg") wider than a typical T-stool but so far it works very well for my student.

Toothpaste
Sometimes I have a stroke of brilliance that may not seem as exciting and brilliant to your average person. And I often find myself doing things that most people never do. But sometimes there are at least a few other people who do those things and that stroke of brilliance may help them out. And at the risk of making the majority of the world wonder if I've completely lost my mind, I decide to share that idea in the hopes that it will help someone out. This is one of those things. You may think I'm totally nuts, or you may find this to be helpful (or you may think "I've been doing that for years, what's the big deal?")
Students with more severe forms of Autism Spectrum Disorders often need to work on functional, daily-living skills at school. One such skill - brushing teeth - is, I'm sure, practiced in many classrooms. The fact that my students work on brushing teeth isn't the weird part. :-)
I found that many of my students (and probably lots of typical kids, too!) squeeze WAY too much toothpaste on their toothbrush. And toothpaste (if you've ever had tablespoons of it smeared on the bathroom counter you already know this) is incredibly difficult to clean up! So I set out to find a way to keep my kids from making giant sticky blue messes while wasting several dollars worth of toothpaste each week - that would still allow them to develop independence in brushing their teeth. My first thought was - Mentadent! It comes in a pump that only dispenses a small amount per pump - pumping is more difficult than squeezing and makes it easier to control. However, I can't find it ANYWHERE except online and can't find a "kid's" version and I doubt my finicky kids would like it ... so back to the drawing board.
I decided to try travel-size containers of toothpaste - at least then they can only squeeze out so much, which limits the amount they can waste. As they used the travel-size containers, I noticed that as they got closer to emptying the tube, the amount of toothpaste they used was becoming more appropriately sized.
1. Travel-sized toothpaste tubes are expensive, when you consider how much you get in them
2. My students were more successful with almost-empty tubes
So ... I decided to buy large tubes of toothpaste and refill the small tubes - but not refill them completely! For months now I've been making my OWN giant blue sticky mess while I try to refill the small tubes ... and I was wasting quite a bit of toothpaste myself. (Here's where the weird part begins) I woke up in the middle of the night with a flash of genius. Use a syringe!! So this morning I refilled toothpaste containers without making a mess!! And it was SO easy!! So I thought - maybe someone else out there is trying to figure out how to refill travel-size containers of toothpaste in their classroom, too. And this blog post was born. :-)


 I have this toothbrush caddy that I got from Lakeshore, each child has a toothbrush with a cap labeled with their name. They also have their own tube of toothpaste (that way, when they lick the toothpaste straight out of the tube before I can stop them ... I don't have to throw the whole thing away!) with their initial on the cap of the toothpaste. I put little 3 oz cups along the bottom of the toothpaste caddy, put the toothpaste in the cup under each kid's toothpaste. There is also a little basket of bathcloths on the counter.
Some students come in and get their own toothbrush/toothpaste/cup/cloth, for others I lay out their things by the sink. Some fix their own toothbrushes, others get some help. Some brush independently, others get assistance, etc. After they finish, they throw their cup away and put their cloth in the laundry basket. Some get their own new cup and put their toothbrush/toothpaste/cup away - others give their toothbrush/paste to me (or a para) and we get a new cup and put it all in the caddy.
Another side-note: the toothbrushes I use (and LOVE) are FireFly toothbrushes - you squeeze the bottom and a light in the handle of the toothbrush begins to blink. It blinks for 60 seconds - visually letting my kids know how long they need to brush!
ABLLS-R Resources
The main assessment tool that I use in my classroom is the ABLLS-R, which is an "Assessment, Curriculum Guide and Skills-Tracking System for children with language delays ... based on the science of Applied Behavior Analysis with Skinner's theory of Verbal Behavior along with research by Dr. Partington and includes 25 repertoire areas covering 544 skills." (from Behavior Analysts Inc product description)
In this post, I'm not going to get into an explanation of the assessment or how to administer it (though here is an awesome presentation that does just that), I mainly want to share some of the resources I've found very helpful in using the ABLLS-R, both as a curriculum guide and as an assessment. Even if you do not use the ABLLS-R in your classroom, the resources here will undoubtedly help you in teaching students with ASD. I am, however going to share two points that I think are the biggest selling point for classroom teachers:
While at first glance, the ABLLS-R seems like quite a daunting task to undertake, in the long run it makes life SO much easier in SO many ways!! When working with students who have disabilities, especially autism, we often have difficulty understanding why they can't get to that "next step". We know that students with disabilities often need extra steps between the steps that make up typical developmental progress, but it isn't always obvious what those bridging steps may be. The ABLLS-R breaks down practically every skill that you can think of into smaller steps and makes it easier to see where that "disconnect" is between what the child can already do and what the next "typical step" is. Then we can teach those in-between steps and help the student get to the next big step. It practically writes your present levels or performance as well as IEP goals/objectives which are specific, measurable, attainable, and are directly related to the PLP!
 One of my very favorite parts of the ABLLS-R is that it visually shows the progress that a student has made from year to year on the tracking form in the front of the book. This is very helpful in IEP meetings, to show parents "Everything you see in blue here is something Johnny was not able to do last year but can now do". This gives the parents (and other IEP team members) a very clear overview of the progress a student has made across all domains.
 Like I said, the ABLLS-R can be quite intimidating when you first begin to look into using it - the mind reels when you begin thinking of the data sheets to build, materials to gather, etc. But there's no need to reinvent the wheel!! Here are some resources that will save you time and sanity (though some are free or inexpensive, others are a bit costly but, in my opinion, well worth the money!)
the actual Assessment Manual and Protocol itself can be purchased from several companies, including:
Behavior Analysts (which also offers the WebABLLS which is awesome)
Different Roads to Learning
Western Psychological Services
Data sheets/Tracking:
Autism Concepts has a set of 391 data sheets for the collection of data during lessons that include the objective, mastery definition, response, and the individual skills to meet the objective - available digitally (PDF) or in print
Tracking Sheets has data collection forms for ABLLS and ABLLS-R objectives as well as other resources
Jan Palmer has downloadable tracking graphs in MS excel format
While not specific to the ABLLS-R, many of the data sheets in Sandbox Learning's monitoring materials apply to skills assessed on the ABLLS-R
Flashcards/Materials:
Different Roads to Learning sells a kit with all of the materials needed to complete the ABLLS-R - the kit comes either with or without the assessment manual and protocol. They also have most of the materials in the kit available for purchase outside of the kit - because many classrooms will already have materials for several of the sections.
VB Teaching Tools also sells a kit as well as separate materials.
Autism Concepts has a series of 1003 flash cards with all the photographs and letter/word flash cards required to teach to the ABLLS-R criterion, each labeled with its respective ABLLS-R Objective and numbered for easy retrieval and filing. Comes with a Microsoft Excel spreadsheet indexed to objective, picture number, picture description, and category
Stimulus Publications sells the "Autism Skill Acquisition Program" which contains all of the materials needed to conduct the ABLLS-R
Palmetto PEARL offers on-demand printable flashcards that correlate with the ABLLS-R
Other resources:
Autism Concepts has a set of 392 color coordinated and indexed ABLLS-R Skill Cards to aid instructors in teaching the ABLLS-R skills.
Navigation Behavioral Consulting has several posts about "Understanding the ABLLS-R"
Verbal Behavior - a wiki with tons of helpful stuff, including ABLLS-R tracking grids
Mariposa School offers the Pocket ABLLS for sale
Watch Me Learn videos have kids modeling the skills addressed in the ABLLS-R
What are some of your favorite resources for using the ABLLS-R in your classroom?
Brain Pop
When teaching students with autism, we often struggle to find ways to make the things they "have to learn" (i.e. standards) fun and meaningful to them and how to teach them in a way that interests the students. Brain Pop and Brain Pop Jr. make that SO much easier!!
In my classroom, we watch more than one Brain Pop and/or Brain Pop Jr video most days. There is a video for practically every topic you can think of - and you can search State Standards to find a video that corresponds to whatever you are teaching. The videos on Brain Pop have links to related videos, games/activities, quizes (GREAT for interactive whiteboards) and "More information" (printable information covered in the video) and Brain Pop Jr has "Info for grownups" with ideas and printables for extending the lesson.
My students love Moby (a robot! how autism-friendly is that?) and of course they'd rather watch something on the computer than listen to me talk about it. Check out the free videos and the load of good info on their site -like the Brain Pop for Educators blog and the Grown Up Guide for Brain Pop Jr.
Video Modeling
Video modeling is an effective way to teach many students with autism. When a child will attend to a video (on the television or computer) better than to another person in real life (which is often the case with students who have autism) video modeling is more likely to be successful than in vivo modeling. Additionally, videos allow the student to re-watch certain steps repeatedly, and it frees up the teacher to interact with the child and prompt them (which is difficult to do while simultaneously modeling a behavior!).
Video modeling is especially helpful for those activities or behaviors that you can't model in class (bathing comes to mind) as well as those that are logistically difficult to model frequently (grocery shopping, eating at a restaurant).
One more benefit that I'd like to mention is that video modeling can allow parents, teachers and other therapists to collaborate and use the same method, terminology, etc. when working with a student - we know that students with autism tend to be very literal and have trouble generalizing - if everyone is on the same page, the student can learn the initial skill more quickly and THEN we can work on generalization systematically. Otherwise - if the parents are teaching a student how to do something (let's say put on a jacket), the teacher is teaching another way, and the OT is working on a different way, the child is less likely to learn the skill because they aren't getting consistent practice. And let's face it, trying to write out exactly what you're doing so that another person can try to replicate your instruction is tedious and maybe even impossible. If you use a video and everyone is working from the same video, all teachers/therapists/parents/etc. are doing the same thing with the child and the child will be more likely to experience success!
Video modeling can be used to teach (or review) many types of skills - academic, social, self-help, community, play and more.
I am a huge fan of the "Special Kids" videos - my students love "Mr. John" and they have learned a lot from his videos.
Other places you can find video modeling videos:
- YouTube I searched autism + "video modeling"
- Model Me Kids
- Social Skill Builder
- Watch Me Learn (*now has an
iPhone app!)
It's also very easy to make your own videos modeling things using the exact wording and steps that you want to include. (Perhaps you are working with a lower functioning student and you need each step broken down and described more than in the video you found - or you have a student who can do most of the steps independently and you only need certain steps described and broken down).
Here are two videos I made modeling the steps to washing hands and brushing teeth.
(I want to point out that when you make your own videos, you should do what I didn't do and make sure you have everything set up beforehand - we did this after school and we had already cleaned up the bathroom for the custodians to mop - so the trash can and laundry basket weren't under the counter for the toothbrushing video)
Additional resources:
Here is a video from a conference about video modeling and
Here is a book about video modeling.
Subscribe to:
Posts (Atom)